Introduction
In my previous post I showed how to use a reverse proxy in an Azure API App to call an on premise REST API. The problem with this default implementation is that it is a public address using "http" which is open to anyone that can find the URL to your Azure API App. I prefer not to have security by obscurity and so in this post I'll be talking about how to secure your Azure API App and then will show you the steps in order to protect your Azure API App.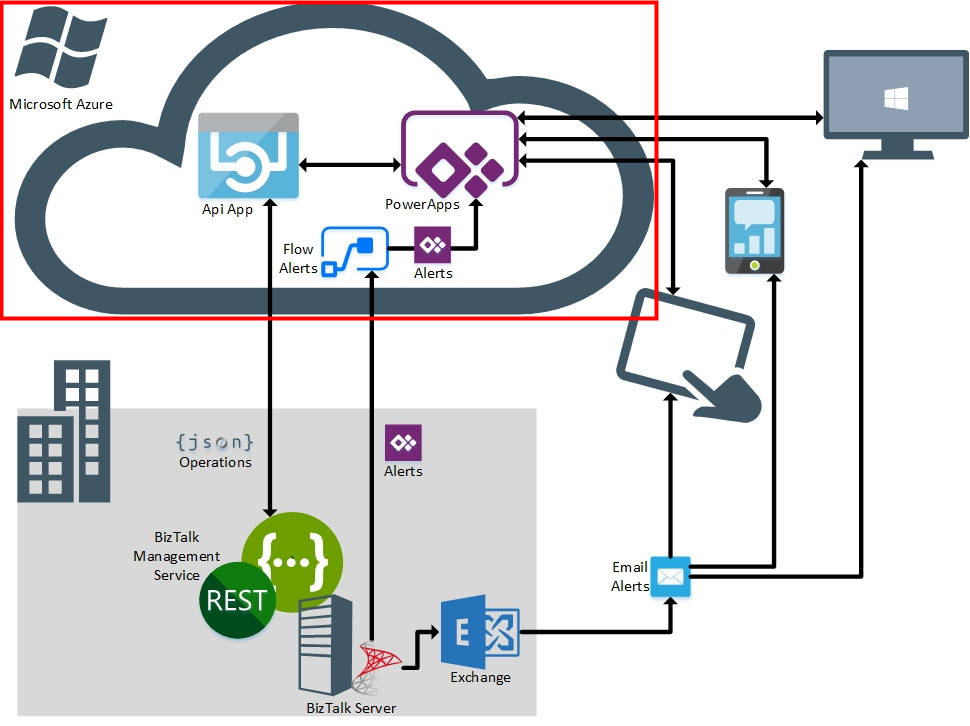
3. Security
There are a number of ways in which to protect your Azure API App such as API Management, Azure Active Directory or even a combination of the two. You can even restrict access to your Azure API App via an IP Address.
Azure API Management also known as APIM, is another service offering from Microsoft which provides a way in which to "manage" your API. It essentially sits in front of your API and allows an array of feature called policies which provides features such as caching, throttling of service calls to and from your Azure API App, translating SOAP calls to REST (and vice versa), limit operations / service calls etc. Using APIM you can provide the security mechanism to allow authenticated parties from using your Azure API App. For more information on APIM, see https://docs.microsoft.com/en-us/azure/api-management/.
The drawback with using APIM is the cost of using it (see https://azure.microsoft.com/en-ca/pricing/details/api-management/), so instead I'll be showing how to protect your Azure API App using Azure Active Directory. Azure Active Directory provides identity management and a range of other features such as multi-factor authentication, role based access control, auditing and security monitoring etc.
So with a brief description of what Azure Active Directory is, lets get started with the steps to implement Azure Active Directory with you Azure API App.
Azure Active Directory with OAUTH2
The following steps will show you how to setup your Azure Active Directory (Azure AD) to secure your Azure API App using your default Azure AD User account.
1. Sign into the Azure Portal.
2. Locate the Azure API App that you wish to protect.
3. Scroll down and click on Authentication/ Authorization and then click on "On".

4. Click on the drop box next to "Action to take when request is not authenticated" and select "Log in with Azure Active Directory".

This setting ensures that when any anonymous request attempts to browse to your Azure API App must be authenticated using your Azure AD, although we still have a few more steps in order to complete this.
5. Click on "Azure Active Directory".

6. Click on "Express", ensure that you have selected "Create New AD App", then add the word "App" to your Application. (This will help later when you need to identify what is an application and what is an identity which I'll explain later in this post.) and finally click on "OK".

This generates an application in your Azure AD which will be the
7. Click "Save".
7. Click "Save".


Creating the identity Application
Now that you have your application registered in Azure, you now need to create the identity Application which will provide the security for your application.1. You should still be in the App registration screen from the previous step, if not browse to Azure Active Directory and click on App registrations.
2. Click on New application registration:

- Name: Type in your <application name>-Identity E.g. BizTalkAppNameGoesHereApp-Identity
- Application type: Web app/ API
- Sign-on URL: https://login.windows.net

4. Click on Create.
5. Once it appears in the App registrations, click on it to open its settings.
6. Click on Reply URL's, click on the first empty row and then add "https://msmanaged-na.consent.azure-apim.net/redirect".
7. Click on Save.
You should now see the following:

8. Close the Reply URLs screen and go back to the settings and click on Required permissions.
9. Click on Select an API, then in the "Search for other applications with Service Principal name", type the name of your app, which should include the App at the end.

11. In the Enable Access screen under Delegated Permissions, click on the tick box next to Access BizTalkAppNameGoesHereApp and then click on Select. (Note if you tick on the box next to delegated permissions, the Select will not become active.)

13. Click on Keys.
14. Type in the following:
- Key description: BizTalkPowerApp
- Duration: In 1 year
- Value: Enter a password
Then click on Save.
15. Copy the Value that gets generated into notepad as Client Secret. (This will be used later in my next post "PowerApps".)

17. Copy the Application ID and paste it into your notepad as Client ID. (This will be used later in my next post "PowerApps".)

To test the authentication.
Open a browser with InPrivate Browsing if using internet explorer or with Incognito Window using Chrome and browse to your Azure API web site.

Once you sign in you should be able to access your Azure API App:

No comments:
Post a Comment